How to use custom campaigns in Google Analytics

Google Analytics offers many ways to customize the data you’re tracking. One of these ways to track visitors, exactly the way you want, is custom campaign tracking. In this post, I’ll explain what custom campaigns are and how you can use them.
Custom campaigns
Custom campaigns are best explained with an example. We use custom campaigns to track the amount of traffic and sales coming from our newsletters, the amount of traffic and sales coming from the banners within our plugins, from our social media efforts and so on. Using custom campaigns you can track links to your site better, so you’ll have a greater understanding of how people land on your website.
When you’re creating a custom campaign, you can manually set a referral source, a marketing medium and name your campaign, among other things. In Google Analytics you’ll be able to see where people came from and even exactly what link or banner they clicked to get there.
Let me clarify this by showing you one of the custom campaigns we use for tracking our posts on Facebook. The link structure always helps me understand custom campaigns, as it acts as a kind of guide on which data I have. And it lets me know exactly where to find this data in Google Analytics. This then shows me what data I can filter and analyze for.
As you can see, this is a pretty long link. There are actually 4 different elements to this link:
https://example.com/shop/#utm_source=facebook&utm_medium=social&utm_campaign=shop-sale-august-9
- First of all, this link will simply go to our shop page which lists all of our products. It’s the first part of that link: https://example.com/shop/
- Second, there’s the “&utm_source=facebook”part of the URL. The “utm_source=facebook” shows that the source which tempted the user to click that link was on facebook.
- The third part of the URL is the “#utm_medium=social” part of the URL. The hashtag is there to notify Google Analytics that this is a link with custom campaign tracking. The “utm_medium=social” part reveals that the medium the user clicked to get to that page was from a social account. So now we know someone entered our shop page by clicking on a link on one of our social accounts.
- The fourth part of the URL is “&utm_campaign=shop-sale-august-9”. This basically tells us what type of campaign it is. And that makes it much more specific. So when we check our Google Analytics data, we’ll know how much traffic and sales our Sale campaign got.
There’s also the “&utm_content” UTM tag. You can use this specific tag to define the type of content you want to track. For instance, you can add the title of your post here.
These campaigns are obviously custom, so you can name them whatever you want. However, for your and other’s understanding, it’s easier if you give these UTM tags logical names.
How do I get these URLs?
You don’t have to be afraid that you’ll have to memorize the setup of these URLs. Google has made a nifty little tool that lets you create custom campaigns like this with amazing ease. You can find that tool here. All you have to do is fill in a website URL, a medium, a source and a campaign name. After that you can click “Submit” and the tool will give you your custom campaign link!
However, if you generate your custom campaign links there, the links will start with a question mark instead of a hashtag. This might seem innocent, but in fact, it’s not. A question mark has a meaning on the server side of things. This means it’s an actual permalink (URL) in its own right. And that can create issues of duplicate content because there are now two (or more) different URLs with exactly the same content. If you instead use a hashtag, this won’t happen, since everything after the hashtag will be ignored by search engines.
Custom campaigns in Google Analytics
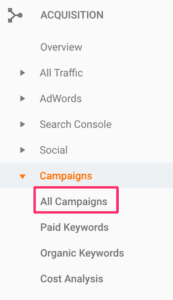
When you’re logged into Google Analytics, you’ll find the “Campaigns” menu item under “Acquisition”. When you click it, you’ll see all of your campaigns, sorted by the amount of traffic they generated.

Here you can select any element of your custom campaign to be your primary dimension:

This can already give you a lot of insight into which campaigns are generating the most traffic, or the most money if you also have the Ecommerce Tracking set.
Custom campaigns as secondary dimension
Although viewing the custom campaigns as a primary dimension can give you interesting information, it’s still pretty general. And I always like to have my data as specific as possible. That’s why I mostly use my custom campaigns as a secondary dimension.
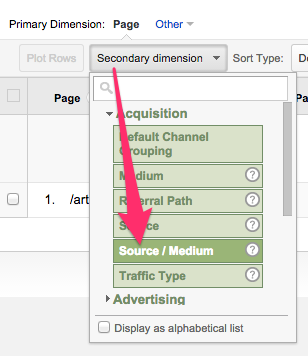
For instance, you can pick one of your pages (Behavior -> Site Content) and select “Source / Medium” as your secondary dimension:

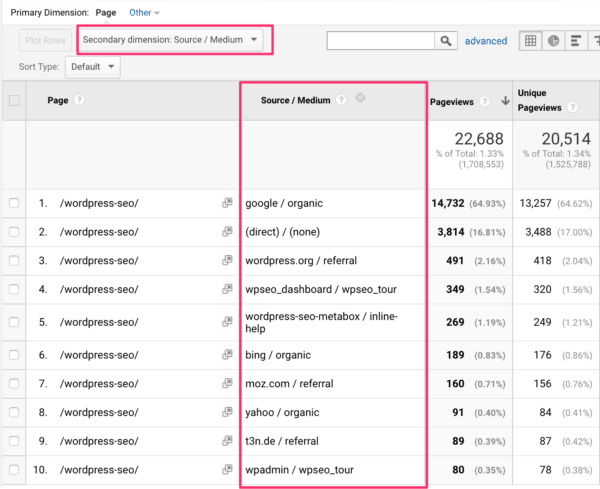
This will give you the traffic for that specific page, sorted by source and medium. Let me show you an example of our WordPress SEO article page:

As you can see, this shows us very specifically where traffic is coming from and how much of the page’s total traffic can be attributed to each (custom) campaign. If you’ve enabled Ecommerce Tracking, you can also do this for your products. This gives you a wealth of knowledge about where your traffic and sales are coming from. And, as I said, it also shows you how big a part your custom campaigns play in the totality of a product’s sales or page’s traffic.
Custom campaigns in segments
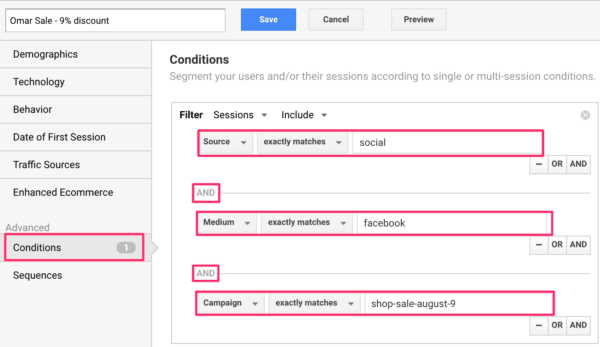
If you want to browse through all the Google Analytics tabs with just the data from your custom campaign, then creating a segment is the best and easiest way. I’ve written a post about segments in Google Analytics that explains how you can create segments yourself. But here’s a screenshot of the segment I’d make, based on the example given earlier:

In the segment above, I’ve basically covered all UTM tags. But of course, you can get away with just adding campaign=shop-sale-august-9 since that’s the only UTM tag in our link that’s unique.
Take note
Before you enthusiastically start tagging all the links you can think of for custom campaigns, there’s one thing you need to know. The way custom campaigns are set up, means that you will lose all other referral data.
For instance, if you start using custom campaigns on social media, be aware that you should specify the social medium in the campaign as well. Otherwise, you simply won’t know whether people came from Facebook or Twitter, because that referral data will be overwritten by your own custom campaign.
Read more: Use Social Media to increase your sales »
Start customizing your tracking!
So now you know. You’re not completely dependent on what’s in the basic analytics of Google, you can pinpoint the exact data you want for yourself!
What do you think? Let us know in the comments!
Keep reading: How-to guide: Tracking your SEO with Google Analytics »


Discussion (9)