Canonical URLs in Yoast SEO
Yoast SEO adds canonical URLs to your WordPress or Shopify website for all content that has been marked for indexing by the search engines. It does this automatically and in 99.9% of the cases, you don’t have to change anything about them. If, however, you do want to change the canonical, we explain how you can do that in this article.
What are canonical URLs?
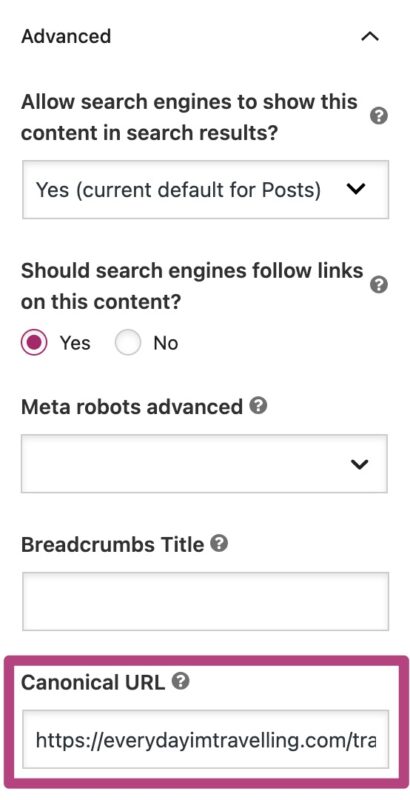
You might have posts or pages on your site with similar content. For example, you could have products or content that can be found on multiple URLs. To avoid confusing search engines, you can tell search engines which URL contains the original content. You do this by adding a canonical URL in the Advanced settings of the Yoast SEO meta box.
Warning: Undefined array key “className” in /home/staging-yoast/staging-platform.yoast.com/versions/05aa62c2ec01538957086672ffa4a059780fd784/web/app/themes/yoast-theme/html_includes/blocks/landing-page/block-landing-page-list.php on line 21
Do you have pages with duplicate content? In that case, it may be better to merge them and use a redirect! With Yoast SEO Premium, it’s very easy to set redirects and avoid duplicate content ! Read more about whether you should use canonical or redirects in this ultimate guide
How to change the canonical URL
You can enter a different canonical URL for each piece of content in a separate field in the Advanced section. Follow these steps to make the changes. Click on the appropriate tab to see the instructions for the platform you are using.
1. Log in to your WordPress website.
You are now in your ‘Dashboard’.
2. Go to the post, page, or taxonomy for which you want to change the canonical URL.
On the left-hand side, you will see a menu that allows you to navigate to your posts, pages, and other content. Find the content you want to edit, and click on it to access the editing screen.
3. Once you are in the editing screen, go to the ‘Advanced’ section in the Yoast SEO sidebar or meta box.
Note: the Advanced section in the meta box is part of the SEO tab.
4. Enter the full canonical URL, including http/s and www or non-www, in the ‘Canonical URL’ field.
5. Update the post, page, or taxonomy.
Canonical elements for paginated archives
In Yoast SEO we also add tags to paginated archive series. Those are the rel=”next” and rel=”prev” tags, that give search engines more information about your content. If the tags don’t work on your paginated content, read this article about paginated content.
Developer code
If you want, you can also filter the output of the canonical programmatically. To do this, you can use the wpseo_canonical filter. If you return false on that, no canonical will be output. Some examples can be found here.
1. Log in to Shopify.
2. Go to Apps and select Yoast SEO.
3. In the Optimize tab, navigate to the product, page, collection, blog post or blog you want to edit and click on it.
Note: if you are already in the product, collection, page, blog, or blog post editing screen, you can access the Yoast SEO optimizing screen by clicking the More actions button at the top of the screen, and then selecting Optimize with Yoast SEO.
4. Navigate to the Advanced tab in the Yoast SEO sidebar.
5. Enter the full canonical URL, including http/s and www or non-www, in the ‘Canonical URL’ field.
Troubleshooting
I do not have a canonical tag
In some cases, you may not see a canonical tag being outputted on a page. If this is the case, check to see if the page has a noindex
tag. If it does, that is the reason why. We do not output a canonical tag if the page is marked as noindex
. To resolve the issue, mark the pages as index
.